
MATE is not only lightweight but also pretty customizable. We can tweak it to change how it looks and feels. Today we are going to discuss a little about that — customizing Ubuntu MATE.
1. MATE Control Center
As with many other distros, MATE has got a centralized place with various settings for managing your system. It’s called Control Center. And the first place you will have to look for customizing MATE is the Control Center.
Whether you are seeking to partition your hard drive, manage users, install something or change the appearance, you can peek here.

2. MATE Tweak Tool
Just like the GNOME Tweaks tool, MATE has also got a small utility for fine-tuning the desktop environment — MATE Tweak. You can manage desktop icons and make small interface tweaks for icons, context menus or toolbars from here.
There are options for customizing the MATE Panel (which we will soon discuss). Various Window related options — like performance, behavior and appearance — are also present here.

You can access MATE Tweak from the Control Center. Or with the following command:
mate-tweakA little trick: Press Alt+F2 together, type mate-tweak and press enter. Voilà!
3. Panels
Panels are an important part of MATE desktop environment. If you see a thin bar at the edge (generally top or bottom) of your screen, that is called a panel. You will have at least one panel on your screen.
Adding New Panel: For adding new panel, right click on the existing panel and click the “New Panel” button from the popup menu. A new blank panel will appear.

Customizing Panels: For customizing an existing panel, right click on it and click the “Properties” button from the popup menu.
You can select the position of that panel from the popup window, change the size and how it behaves. You can also change its background.

4. Applets
Now that we know about panels, we ought to know about applets. Applets are the little things that sits on the panels. They can be menu, various indicators, buttons, tiny tools like clock, sticky notes and such.
There are a decent number of applets available for MATE desktop environment.

Adding Applets to panel: For adding applets to a panel, right click on the panel and click the “Add to Panel…” button from the popup menu.
You will find a list of all the available applets. Just select the one you want and click on the “Add” button. Or you can drag and drop it on the panel.

Customizing Applets: Right click on any applet on the panel.
You can move any applet on the panel or remove them from there. Some applets also have additional options — like Edit, Preferences etc.
After you are finished with the adjustments, you might also want to lock them to the panel.

5. Wallpaper
Changing wallpaper is as straight-forward as it can be on MATE. Right click on the desktop and select “Change Desktop Background“.

Select the background, its style and close. That’s it, plain and simple.
6. Themes
Theme is one of the main aspects of customizing any desktop environment. MATE has support for custom themes. Before we proceed, we should know that — there are mainly three types of themes:
- Window Theme: Window themes mainly manage the window border and appearances related to window manager. The default window manager for MATE is a fork of Metacity. So, any themes for Metacity will work with it too.
- Desktop Theme: Desktop themes manages the rest of the appearances. As MATE has GTK 2 base, any GTK 2 theme should work on MATE. But as there is a good deal of customization over the time and as MATE is gradually embracing GTK 3 (while, of course, preserving the traditional look), you will find that many GTK 2 themes won’t work as expected anymore. On the contrary, you will see that many of the GTK 3 themes will work just fine with MATE.
- Icon Theme: The Icon themes contain icons for various buttons and applications throughout your desktop environment.
Installing Themes on MATE
I wished installing themes on MATE had a uniform procedure. But sadly, there isn’t any. There are different methods for installing different themes:
Manually: For some themes, you will have to manually download the “.zip” file and extract it to the $HOME/.themes directory. If you are installing an Icon theme, the theme folder will go into the $HOME/.icons directory. $HOME is your home directory.
Custom Script: You will need to compile some themes from their source code. Generally, you will clone the theme repository from GitHub and run the script provided for installation.
Using Package Manager: Some themes are available to install via package manager — either from official repository or from PPA. So, installing them is a simple sudo apt install away.
Wherever you find a theme that you want to install, read the documentation provided with it. The documentation should contain detailed information for installing and using it.
Also, keep in mind that sometimes a theme contains all the necessary Window, Desktop & Icon theme but sometimes it doesn’t. If it doesn’t you will have to separately install them. So I’m saying this again — always follow the documentation.
Customizing the Themes
The cool part about MATE themes are that you can use different parts from different themes and combine them together. And for doing that you will have to use the Appearance tool from the Control Center.
It has four sections for customizing the appearance of your desktop environment and one of them is named, conveniently, Theme.

Here you can see all the installed themes on your system. Select a theme you want to use and hit the “Customize” button. You will see a new popup window where you can start mixing up and customize your themes.

Choose your desired Controls, Window Border, Icons and Pointer parts. And then you save it as a new custom theme. You can install downloaded theme packages from here too.
Finding themes for MATE
You can check GNOME Look website for finding and downloading various themes for MATE.
There are many themes that are not listed in the mentioned place. You will have to search around a little and keep an eye on various community blogs (like us) about Linux to discover new ones.
7. Fonts
You can customize the fonts using the Appearance tool from the Control Center. Open it and select the Fonts tab.

From here, you can select fonts for different parts of your desktop environment.
8. Customizing the Login Screen
If you use LightDM with MATE, you will have a LightDM GTK+ Greeter setting in the Control Center. From here you can change the appearance of your login screen.

You will find a bunch of options here for customizing it. If you use some other display manager, it might provide this type of tool too. Don’t forget to check the Control Center for it.
9. Customize Terminal
For us Linux users terminal is one of the main aspects of our OS, and like any other part we want our terminal to look beautiful.
The default MATE terminal provides many options to modify its look. You need to open terminal, and choose Profile preferences from edit menu.
Here you can find options like change palette colors, transparency, background, font and much more.

Other changes
There are also a few other tools in the “Look and Feel” part of the Control Center.
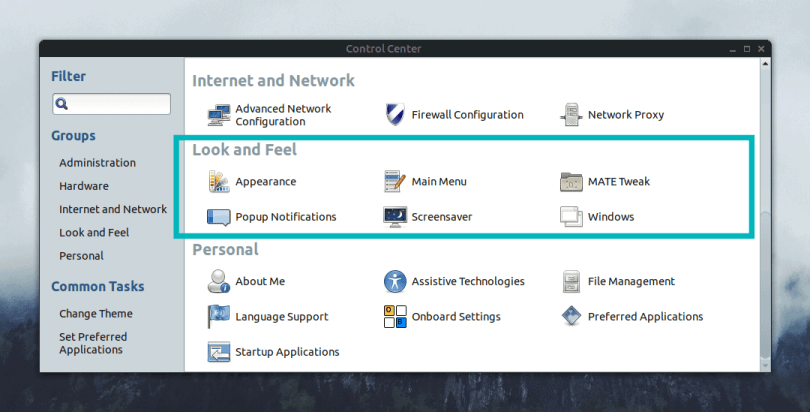
The Popup Notifications lets you configure how your desktop notifications will look & feel, and the Screensaver is pretty self-explanatory. Just, dig around for a little. Keep tweaking things until you feel satisfied with the result.


